Vector graphics
Moscrif is running on various platform mobile devices with different performances and resolutions (from cheap low-end devices to the newest high-end like iPad2 or Samsung Galaxy Tab). It means that application written in Moscrif should look nice on all resolutions from 240x320 to 1024x768. The best way to achieve a smooth graphics on all resolutions is using vector graphics. Vector graphics take only few bytes compared to bitmap graphics.
Vector graphics use geometrical primitives such points, lines, curves, and shapes or polygon(s). Geometrical primitives are based on mathematical expressions, representing images. Information about these primitives is usually saved in SVG files (*.svg).
SVG file is a xml file that contains number of different elements. One of the most important elements is a element, where vector graphics are defined. More then one element can be defined in one SVG file. Path element contains properties, which specify appearance of graphics like style, fill, stroke etc.
D-property specify some of the following commands:
- M = move to
- L = line to
- H = horizontal line to
- V = vertical line to
- C = curve to
- S = smooth curve to
- Q = quadratic Bézier curve
- T = smooth quadratic Bézier curve to
- A = elliptical Arc
- Z = close path
Value of d-property can be found directly in svg file or via an editor (e.g. Inkscape).
Moscrif does not support loading vectors directly from svg files. Moscrif native function Path.fromSVG creates vector graphics from d-property. It means that it loads shape only, without any styles and colours. Styles, colours, gradients and all graphic effects are defined separately in an object of the Paint class.
Canvas.drawPath takes both vector path and paint objects and draws vector picture at the screen.
Path.transform is a method to adjust Vector Path by instance of Matrix that manages all vector transformations.
include "lib://uix/application.ms" var app = new Application(); app.onStart = function(sender)
{
//load vector logo
this.path = Path.fromSVG("M43.02,49.142c5.427,0.001,12.026,2.2,14.74,4.913l18.999,19c2.713,2.713,0.514,4.912-4.914,4.912l0,0c-5.427,0-12.026-2.197-14.74-4.912l-18.998-19C35.394,51.342,37.592,49.143,43.02,49.142L43.02,49.142z M37.56,60.358c0,5.428-2.201,12.027-4.914,14.74L4.913,102.833C2.2,105.545-0.001,103.346,0,97.918l0,0c-0.001-5.426,2.199-12.025,4.913-14.74l27.734-27.733C35.359,52.732,37.56,54.931,37.56,60.358L37.56,60.358z M55.559,43.638c0-5.429,2.199-12.028,4.913-14.741L88.205,1.163c2.714-2.714,4.915-0.515,4.915,4.913l0,0c-0.001,5.428-2.201,12.027-4.915,14.741L60.472,48.549C57.758,51.263,55.559,49.065,55.559,43.638L55.559,43.638z M66.774,49.097c5.428,0,12.026,2.199,14.74,4.913l19,18.999c2.713,2.715,0.513,4.914-4.914,4.914l0,0c-5.428,0-12.027-2.199-14.74-4.914L61.861,54.01C59.148,51.295,61.347,49.097,66.774,49.097L66.774,49.097z "); //get vector path position
var (left, top, right, bottom) = this.path.getBounds();
var pathWidth = right - left;
var pathHeight = bottom - left; //scale vector path to half of the screen
var matrix = new Matrix();
matrix.setScale((System.width / 2) / pathWidth, (System.width / 2) / pathWidth);
this.path.transform(matrix); //get position of the scaled vector path
(left, top, right, bottom) = this.path.getBounds();
pathWidth = right - left;
pathHeight = bottom - top; //move vector path to the center of the screen (parameters are shifts on x and y axis)
this.path.offset(System.width / 2 - pathWidth / 2 - left, System.height / 2 - pathHeight / 2 - top); //create paint object, which fill graphics with black color
this.paint = new Paint();
this.paint.color = 0xff000000;
} app.onDraw = function(sender, canvas)
{
//fill background with white color
canvas.clear(0xffffffff); //draw vector graphics
canvas.drawPath(this.path, this.paint);
} app.run();
The best practice in Moscrif is to keep onDraw function as simple as possible. Objects are drawn at the screen up to sixty times per second. When objects are created or adjusted during rendering, onDraw method is slowed down. It is highly recommended to define all objects outsite of onDraw method.
Let see some example of Path Native moscrif class:
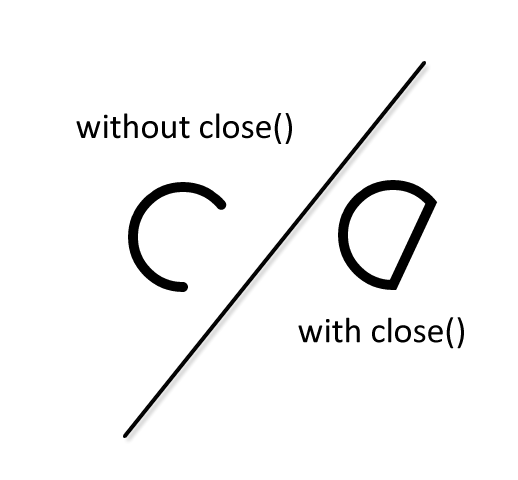
Path.close, this method close the current contour. If the current point is not equal to the first point of the contour, a line segment is automatically added.
... app.onStart = function(sender)
{ // create new instance of Path class
this.path = new Path();
// draw arc. Arc is bounded by rect (100, 100, 200, 200), starts at 90°and ends at 270°
this.path.arcTo(100, 100, 200, 200, 90, 230, true);
this.path.close(); // draw path
this.paint = new Paint();
this.paint.strokeWidth = 10;
this.paint.strokeCap = #round;
this.paint.style = #stroke; }
app.onDraw = function(sender, canvas)
{
canvas.clear(0xffffffff);
canvas.drawPath(this.path, this.paint);
} ...
Path.moveTo, this method set the beginning of the next contour to the point (x,y).
app.onStart = function(sender)
{ // create new instance of Path class
this.path = new Path(); // create cross
this.path.moveTo(100, 100);
this.path.lineTo(200, 100);
this.path.moveTo(150, 50);
this.path.lineTo(150, 150); this.paint = new Paint();
this.paint.style = #stroke; } app.onDraw = function(sender, canvas)
{
canvas.clear(0xffffffff); // draw path
canvas.drawPath(this._path, this.paint);
}
Path.lineTo, this method add a line from the last point to the specified point (x,y). If no moveTo() call has been made for this contour, the first point is automatically set to (0,0).
app.onStart = function(sender)
{ // create new instance of Path class
this.path = new Path(); // create house
this.path.moveTo(100, 100);
this.path.lineTo(100, 200);
this.path.lineTo(200, 200);
this.path.lineTo(200, 100);
this.path.lineTo(100, 100);
this.path.lineTo(150, 70);
this.path.lineTo(200, 100); this.paint = new Paint();
this.paint.style = #stroke; } app.onDraw = function(sender, canvas)
{
canvas.clear(0xffffffff); // draw path
canvas.drawPath(this.path, this.paint);
}
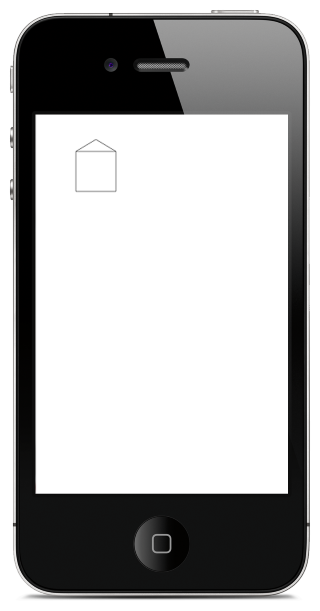
Path.offset, this method set the offset of the path by (dx, dy).
app.onStart = function(sender)
{ // create new instance of Path class
this.path = new Path(); // create house :) in left top border
this.path.moveTo(0, 30);
this.path.lineTo(0, 130);
this.path.lineTo(100, 130);
this.path.lineTo(100, 30);
this.path.lineTo(000, 30);
this.path.lineTo(50, 0);
this.path.lineTo(100, 30); // move them to the center of screen
var (l, t, r, b) = this._path.getBounds();
this.path.offset((System.width - (r - l)) / 2, (System.height - (b - t)) / 2); this.paint = new Paint();
this.paint.style = #stroke; } app.onDraw = function(sender, canvas)
{
canvas.clear(0xffffffff); // draw path
canvas.drawPath(this._path, paint);
}
.png)
For more examples how vector graphics works in Moscrif, please have a look at Pexeso demo. See full Path Moscrif API documentation.